November 26, 2011

The Good, the Bad (looking) and the Delicious!

I hope everyone had a fantastic Thanksgiving and maybe did a little Black Friday shopping... I sure did. it was a very low key event with my closest Family (minus the sis) and the F-Hub. We ate, we lounged, we ate some more and then went home, where I promptly passed out on the couch and only woke up to reposition myself in bed. I had originally thought I would partake of the growing (and slightly out of control) tradition of Black Friday shopping, but I was unable to wrap my head around what I would actually go for and the thought of the cold and the crowds were to much a deterrent... so I woke up and got online. I was still able to get some pretty good deals so i feel like I was more then successful.Anyhoo... back to the purpose of this post... PIES. I made four this year... which considering there were only 7 of us at dinner may have been overly ambitious but I had the time and the want so why not!!

First up... Pecan Pie. once of my favorites and really one of the easiest to make (and by make I don't mean the crust... no need to slave away piecing together pastry dough when you can buy a perfectly good frozen crust for a few dollars)

Ingredients- easy enough

Pre-Bake

Perfection- and tasted great too!

Next was a Banoffee Pie- a what? you say... well its  Banana- Toffee Banoffee... its made with a can of sweetened condensed milk that's been cooked till its basically toffee... there are different ways to achieve this. Once is to boil the unopened can in a pot of water (the can must be completely submerged AT ALL TIMES for 2.5 hours and then cooled and poured over the sliced bananas or it contents of the can can be microwaved for short intervals (so as not to boil over) until the right consistency is reached. I prebaked the graham cracker crust for 10 minutes and then chilled the pie overnight.

super easy.. right

Bananas and Toffee sauce

Finished with fresh whip Cream and mini chocolate chips

Third up isn't really a pie per se but its in a pie crust so I'm going with it. It was a Pumpkin cheese cake. I'm not a big fan of Pumpkin Pie but I love a good cheesecake. Although this one tasted fine, it reaffirmed that I don't like pumpkin pie and it was more that then cheesecake but others liked it just the same... 

ingredients

pre-bake : note best not to overfill the pie as you will end up with this...

it wasn't quite the Grand Canyon of Cheesecakes but it ended up with its fair share of cracks and crevices. but luckily it did taste better then it looked.

Lastly the piece de resistance... Homemade Apple. I may have gotten a little carried away with the apple part of this pie as I was determined to fit as many in the pie as possible apparently. The end result looked a little bit like a nursery rhyme pie but I loved it!

once again pretty basic ingredients

piled high and dotted with butter

kinda expecting black birds to fly out... 

Glorious! and tasted perfect to boot!

 nomm nomm nomm nomm...

I hope everyone had a great Holiday and is enjoying the weekend... I got plans I'm off to get the Christmas Decorations out of storage and get to work!


November 23, 2011

Some Proper Before and Afters...

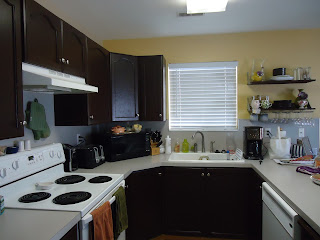
 So it has been a long time coming, granted I took a few breaks in-between but I can with much pleasure say the cabinets are done!! and man do they look good. it's like a whole different kitchen. I still need to paint the baseboards to match but that is minor in the whole scheme of things and that will have to wait until after Turkey Day. But now... the long awaited (if only for my benefit) before and afters!!


messy picture I know but hey... we do live in this kitchen... but doesn't the brass just seem to glow like creepy eyes... yuck!

and the sleek after...


Never mind my Pie baking "goods" peeking out in the corner... I'm prepping for the "big"day :) here are some more beauts!
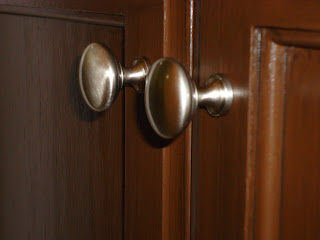


See the baseboards are screaming to be finished but hey... I got pies to bake and turkey to eat... so they will have to wait... but I can't even begin to describe the transformation. I wish I could bring everyone through my kitchen to see them in person cause my camera sucks and the pictures do not do them justice. All in all the project cost about $100 not counting "materials" like paint brushes etc. The Paint kit was around $70 and I'm happy to say that 1 kit did my entire kitchen, including the back of the bar and the half bath that's off the kitchen. I should have just barely enough to do the baseboards. I was extremely pleased as to how far it went. The knobs are pretty plain brushed nickel and I could have probably got them cheaper (just ask my mom) but I have no patience and didn't want to wait so to Home Depot I went and found a set of 25 for about $30 or so ( I don't exactly remember) after finishing the kitchen I have 4 knobs left which is more then enough for when I refinish the upstairs bath. I couldn't be happier with the results, and given the ease (albeit monotony) of the project I would recommend it to anyone who hates their cabinets... And now that this is finished it's on to one of the many other projects I've got floating around in my head... most likely up is the roman shade for the kitchen window... but first. PIES :)  


November 14, 2011

Color Combo Crush- Grey & Yellow

This by no means is a new combo, it's been around for a bit now but I've always liked it, just never felt it had a place in my old apartment. I'm thinking subconsciously this is why I wanted to paint the kitchen yellow. The intent in the kitchen was never to go with this scheme. The cabinets are (well almost all of them) deep brown and the nick-nacks on the shelves are various colors, so no one color combo was screaming out to me until one day a week or so ago I was perusing fabric online (as I often do) and be still my heart I came across this beauty...

via
I'm a sucker for a good geometric print, they are visually interesting but maintain some masculinity, and in this grey it spoke to me. Saying "hang me over your kitchen window, make a roman shade out of me, you know you want to" and well... I did. Also it happened to be on sale at 50% off I was able to get 2 yards for the price of one and at regularly $30/yard it was a steal. (it's currently 40% off at JoAnn's) Well today was like Christmas came early and I got my roll of fabric. At 54'' wide and 2 yards I have more then enough to  roll around in it like it's money  make my desired roman shade and then some. Other prints I'm in love with and thinking of using to make pillows for the kitchen table chairs a window covering of some kind for the half-bath

via 
via
so I really could go on and on with fabric swatches but I'll spare you my obsession.  But not with out leaving you with some glorious pictures of my new arrival.

next to the wall, seriously I need a better camera the pictures don't do it much justice. It's so yummy together. 
I plan to make a roman shade much like described here, now I've just got to finish the rest of the cabinets so I can move on to this project.


November 12, 2011

Snow day!


Days like this make me remember back when I was a kid in Washington and it would snow even just the littlest bit and they would cancel school and just about everything else. When it was perfectly acceptable to hunker down and drink hot cocoa and blow off the concerns of the world while attempting to roll a snow man with 3 inches of snow. A lot has changed, I'm grown now live in Utah a place where snow doesn't work as an excuse to not leave the house (believe me I tried). Life goes on you just adjust your shoes and buy a new beanie. But some things never change... I still love a good snow day.


November 11, 2011

H&M comes to Utah...

Hella people & Mayhem is what it should stand for but its true the great store has finally made it's way to lil ole Salt Lake City the store opened to the public at noon. I waited out the crowds or so I thought and went at 2. There was still a line to get in the store but it moved fast and once inside it was a little crazy but that was to be expected. The longest lines where at the fitting rooms but I've shopped H&M enough to know my sizes so got to skip that party. I made the rounds and found some killer opening day deals like a pea coat for $20!! All and all it was a great success. I've got my fill for a while at least until the Versace line comes out in a week :)
Side note I'm blogging from my phone figured I'd kill some times between shopping so excuse any major errors...

November 7, 2011

We Don't Need No Stink'n Cabinet...

One of the first things we did in the kitchen aside from painting was to take down the lone cabinet to the right of our sink. Upon first glance there was nothing wrong with said cabinet but upon further inspection we deemed it useless, or I did any way... with the positioning of the cabinet, and the fact that the doors didn't swing open wide, me and my short little frame and less then impressive arm span, I couldn't reach anything inside. I don't have any real good "before" pictures (no surprise there) but here is one from when we were painting where you can see where it was... 
see empty space next to window
Removing the cabinet seemed to open up the space which I liked, but clearly something would need to go up in it's place. The F-Hub lobbied for mounting a flat screen on the wall there... where I could see the appeal, I figured that with the 63 inch in the next room we really didn't need another 15 feet away. I have always been a fan of open shelving. thus enters my favorite store (IKEA) and my newest favorite find there...
The Fabian Wall Shelf. with a $6.99 price tag it beat out all the other shelf options I was looking at. Now it seems simple enough but since the wood is unfinished it opens up a world of options. Since I am in the midst of refinishing all the cabinets in the kitchen I just threw those in the mix and used the same paint on the shelves though I was tempted to be a little more adventurous and go for a splash of color but thought I'd play it safe with the kitchen. The installation is also very easy just be sure to use drywall screws/anchors or anything heavier then a pillow is gonna rip a regular screw out of the wall... and no I didn't learn this the hard way... I am all about drywall screws... I've just about mastered the technique. So anyhoo... after a few minutes with a drill, screwdriver and a level I had this....


Now I know I am awful when it comes to taking pictures along the way... but here they are in all their glory. The downside for some with the concept of open shelving is the need to make it pretty... since everyone can see it... you can't exactly store your Tupperware on them. But for me I can make it functional as well as aesthetically pleasing. I've got enough decorative items to make it interesting but I've also got my extra set of dishes, extra glasses, some of my serving platters and some personalized mugs to keep it functional. I do plan on moving the wicker baskets and hanging wine glass racks... but of all the screws I have... none that are small enough, so that will have to wait.  


The Vases and monogrammed mugs are from Anthropologie and most the dishes are from Ikea, everything else are just trinkets and odds and ends I had on hand. All in all I am very happy with the results. Now if only the rest the cabinets would paint themselves. 

UPDATE: I am almost done with all the lower cabinets and the bar. I should have that part of the project completed by Wednesday (fingers crossed) and then will move on to the uppers this weekend... hoping to wrap it all up by the end of next week and move on to the next project!

November 4, 2011

November 3, 2011

Cabinets Revealed!

Let's once again take a look at the before...


and now the shiny new after...


close up of the knobs... which by the way is no easy task to pick out considering picking between satin, pewter, brushed nickle, chrome, and those are just the silver finishes... and then do you pick "knobs" or "pulls" to save time and a little bit of my sanity I went with ones that would fit the existing holes so I didn't have to drill new ones. 


All and all I think this little test was a total success... having gone from this...


to this! 


I am in love with the results... but now the madness begins as I start on the Kitchen.

November 2, 2011

Cabinet Transformations...

Man they do not lie when they say "Transformation". I think this maybe the biggest project yet that I'm willing to tackle on my own but so far so good. I started in our half-bath downstairs figured if it turned out terrible it wouldn't be such a big deal. The Vanity Cabinets basically looked like this


These are actually in the kitchen, I'm not so good with "before" Pictures... but they are the same. Much like every other house built during the same time they are that "awesome" yellow-y oak and as a nice touch they used glamorous brass pulls to finish off the look. Whereas the cost of replacing the cabinets would not be astronomical it seemed slightly more cost efficient to try our hand (well, my hand) at refinishing them. Enter my new best friend Rust-oleum and their genius Cabinet kit. There are a few steps involved including: Deglossing (means no sanding or priming), bond coat (the color coat), decorative glaze and the protective top coat on all the cabinet fronts and the cabinet frames, you can get the full description here. Figure in a few hours between each coat and it's not a super quick process but if you time it right you can have it done in a few days and its worth it in the end.


Quick before tinted bond coat and after. They are looking so good. I managed to get all the deglossing, bond coats and glaze done on the bathroom vanity yesterday. This morning I got the top coat on and hopefully by tonight they will have new hardware and can get them back on the hinges for the big reveal tomorrow... stay tuned!!